E-file Instructions for registered approval authorities
- Key points before you start
- E-file process map
- Instructions for appeals received through e-file
- Instructions for appeals received on paper or via email
- Instructions for level-1 administrators: managing staff access to e-file
- Technical Notes
- Resources/Glossary/FAQs
Important: If you identify an appeal that was filed in error with your approval authority, please contact the appellant immediately to redirect them to the appropriate approval authority so they don’t miss the appeal filing deadline. You will also need to forward the appeal to the Ontario Land Tribunal (OLT) through e-file to be correctly disposed of. You can contact the OLT if assistance is needed.
Key points before you start

Be aware of the difference between appeal and case functions in e-file
- As an approval authority, you should primarily be using these tabs to file cases with the OLT:
- Approval Authority Dashboard
- New Case
- Case Parties
- Approval Authority Cases
- If you are not seeing these tabs in e-file, you are not signed in as an approval authority and need to review the approval authority registration instructions or contact the Tribunal at OLT_efile_admin@ontario.ca.
- Tabs related to appeal functions, such as Appeal Parties and New Appeal, are generally not used by approval authorities except in special circumstances.
You do not need to review and forward the appeal to the OLT the same day it is filed.
Refer to the applicable legislation to determine the specific timeframe you have after the appeal deadline to submit the case to OLT. For example, some legislation may allow up to 15-20 days.
You do not need to wait until the appeal deadline to begin reviewing received appeals. However, it is recommended that you wait until the appeal deadline before packaging the appeals into a case.
This is because if you receive multiple appeals related to the same matter, it is easier to group appeals together before you fill out the case information screens in e-file.
You may receive a mix of e-filed, emailed and paper-based appeals for the same matter over the course of the appeal filing period.
Depending on whether you deal with the emailed, paper or e-filed appeal(s) first, the e-file portal allows flexibility in how you package these mixed formats into a case package. However, it is easier to start packaging into a case by starting with e-filed appeals, as there is less information for you to enter manually.
- If you begin creating the case package from an e-filed appeal, follow these steps to add an appeal received by paper/email.
- If you begin creating the case package from a paper/emailed appeal, follow these steps.
- For a one-page overview of how to handle each format, see the Quick Start Guide (PDF).
Need a high-level view of the full e-file process?
- See the E-File Process Map (PDF) for a step-by-step overview of how appeals move through the portal.
- See the Quick Start Guide for a one-page of how to handle appeals received in different formats (i.e., e-filed vs. email or paper),
Instructions for appeals received through e-file
Step 1: Access and review submitted appeals
When an appellant submits an appeal to your approval authority, the submitted appeal will appear in the e-file Approval Authority Dashboard under the heading "Appeals Pending Review”. See screenshot below: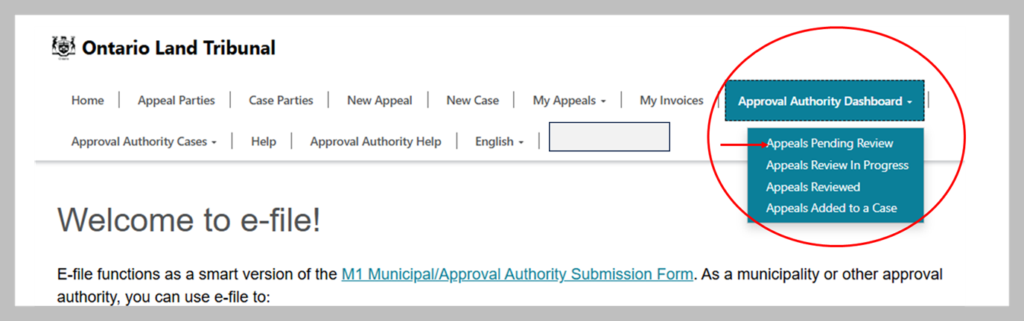
Select the appeal to verify the information submitted by clicking on the Appeal ID, as marked on the screenshot below.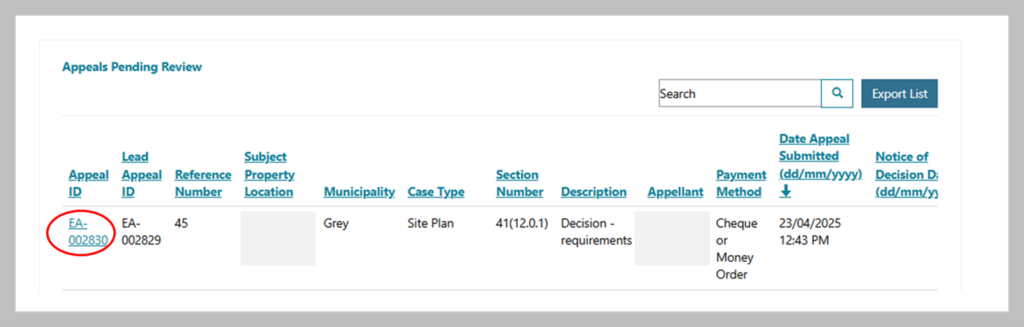
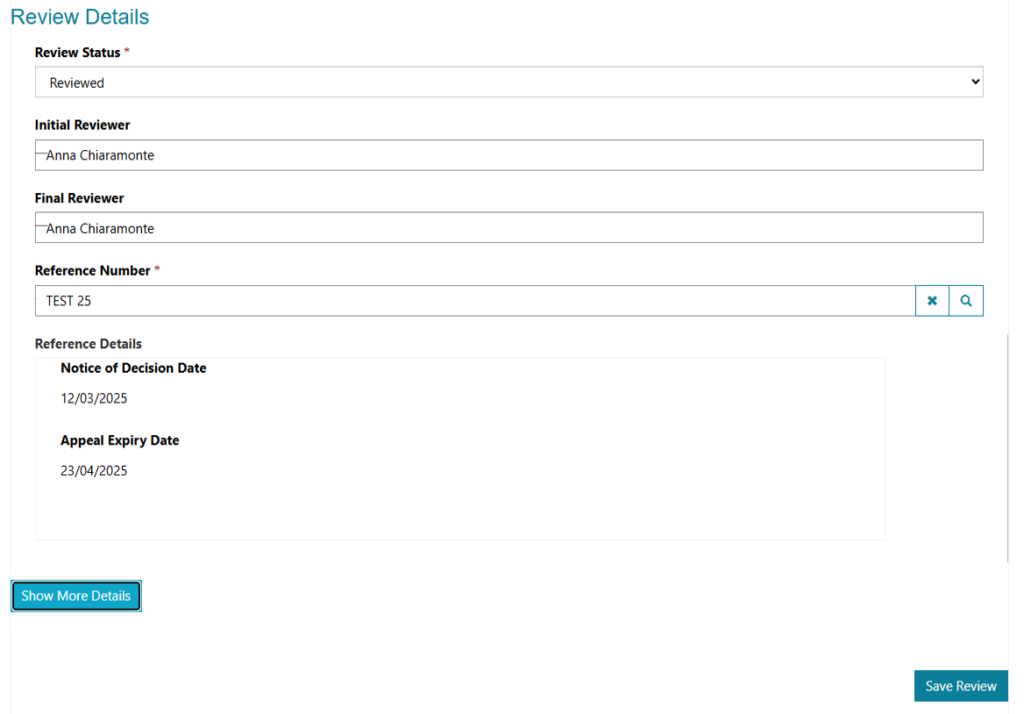
A new screen will appear entitled “Approval Authority Review of Appeal Submission”. To display the details of the submitted appeal, click Show More Details, as indicated in the screenshot below. This will expand the screen to show all the information that the appellant has submitted.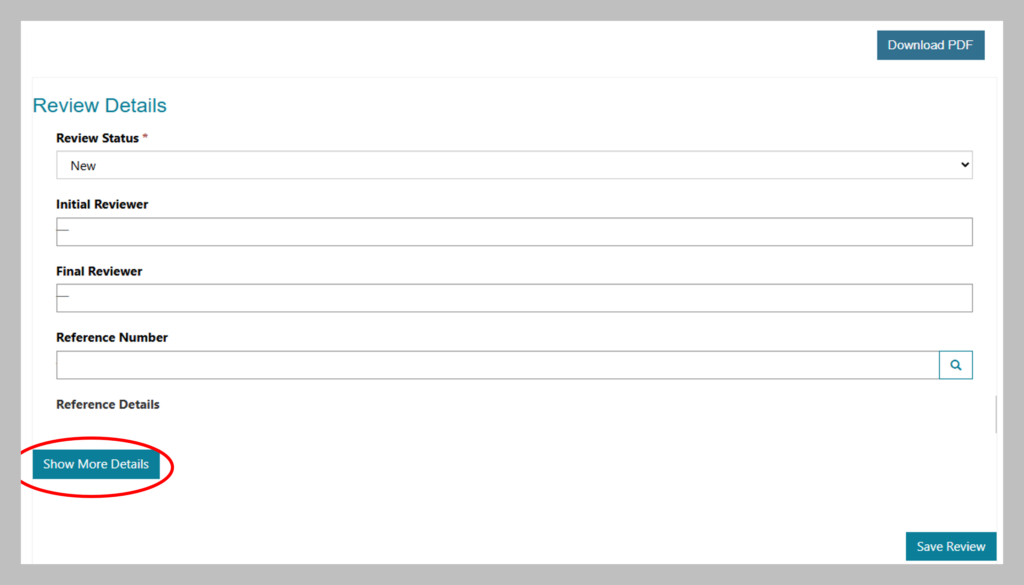
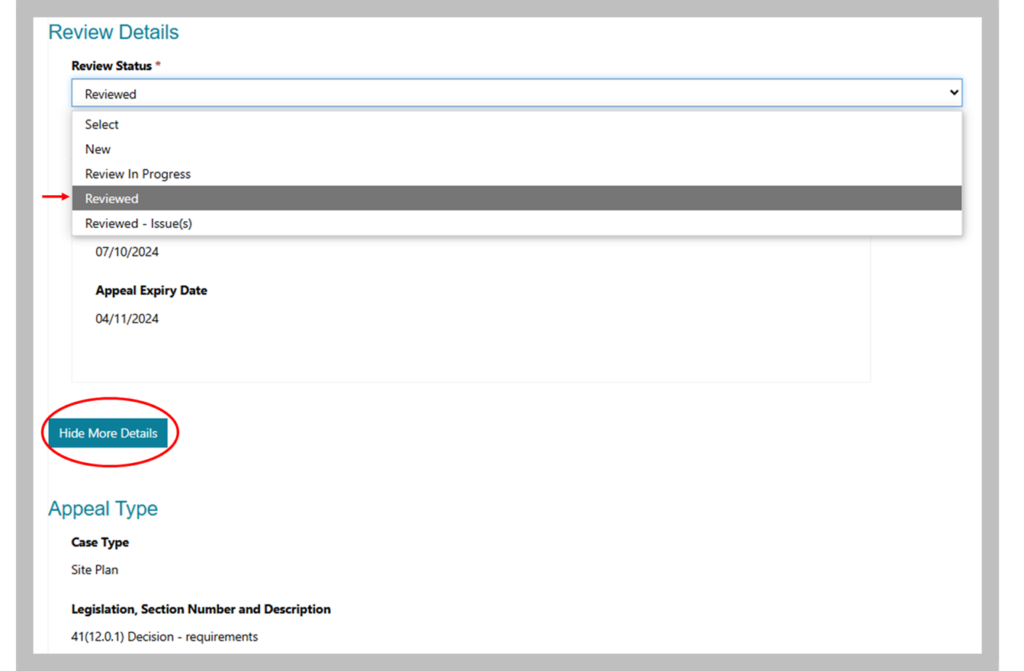
Once you’ve reviewed this screen, scroll to the top of the page and click the button that now says Hide More Details (see screenshot below). This will collapse the screen to hide all the appeal information, so you can easily see the Save Review button at the bottom of the screen.
Change the status of the appeal to indicate you have finished your review by selecting “Reviewed” or “Reviewed – Issues” from the drop-down menu under Review Status). Otherwise, if you’re not yet finished reviewing or are only conducting the initial review, you can select “Review in Progress.” See screenshot below.
Next click Save Review at the bottom of the screen:
You will now be taken back to the “Appeals Pending Review” screen. If you have additional appeals to review, you can do so now. It is advisable to wait until the appeal expiry period has ended before continuing to the next step. This is because you may receive additional appeals over the course of the appeal period on the same matter, and you’ll want to review and group them together before you proceed to the case information step. Please note that after you’ve saved a review of an appeal, it will move to the “Appeals Reviewed” page in the Approval Authority Dashboard tab.
Step 2: Create a case package (the “record” to forward to OLT)
The next step is to create a case and add any required information about the case before forwarding to the OLT. A case package may contain one appeal or multiple related appeals depending how many appeals the approval authority receives on a matter.
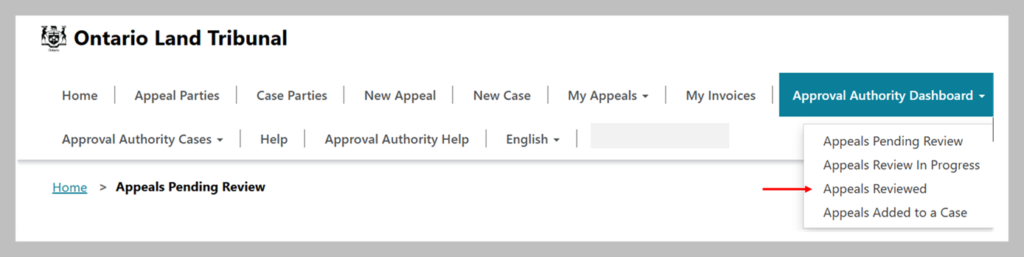
Under the Approval Authority Dashboard, select “Appeals Reviewed” from the drop-down menu to see a list of all appeals that have been reviewed and saved by you or any other contacts within your approval authority from Step 1. See screenshot below.
On the Appeals Reviewed page, proceed as follows:
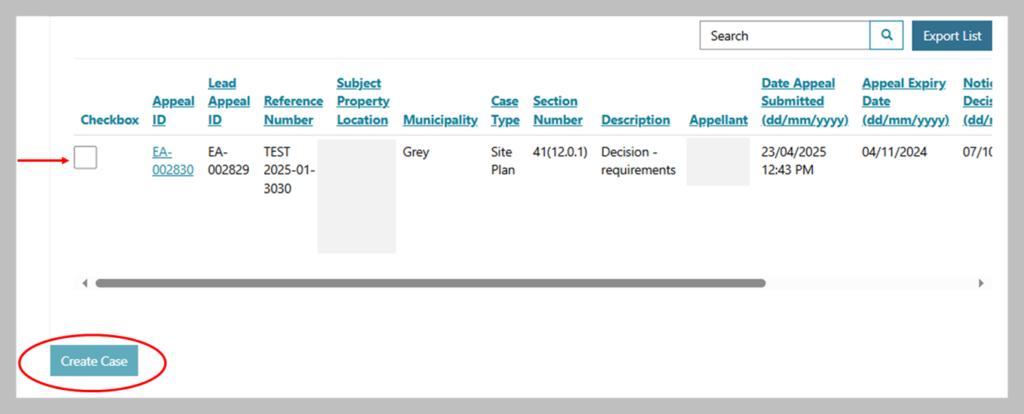
If there is only one appeal on the matter
Select the single appeal and then click the Create Case button.
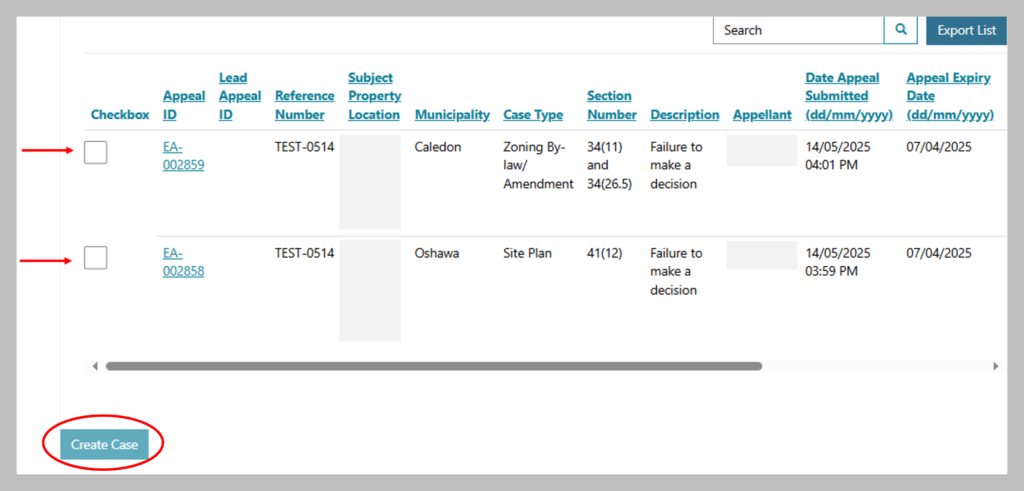
If there are two or more appeals
You will group appeals together if they have the same case type, section number and reference number, e.g., s. 17(24), OPA #42.
Select any appeals that you’d like to group together into a single case package. Note that the appeal you select first will be the appeal for which the details will be displayed during the case package creation flow.
Then click the Create Case button.
If there are paper-based or emailed appeals in addition to appeals that you’ve received through e-file
- Scan the documents and save to your computer.
- When you get to the section of the case submission process where you upload documents, select “Appeal” or "eFile Case Documents” and upload the electronic copy of the appeal form there, including any accompanying documents.
Step 3: Add information about the case that is required by OLT and upload documents
Follow the on-screen directions given in the portal to add information about the case. In creating a case package, e-file allows you to:
- Add the contact(s) from your office for the case.
- Add representative(s) for your approval authority, if applicable.
- Upload documents related to the case such as relevant checklist items and a cover letter.
- Provide specific information about the case (e.g., number of residential units proposed, whether the approval authority intends to appear before the Tribunal, the number and types of witnesses planned, whether appellants made their opinions on the matter known to council, etc.).
E-file will save all the information you’ve entered as you progress through the steps. If you need to stop and come back later, your saved draft will be available under “In Progress Cases” in the Approval Authority Cases tab.
If you receive an additional appeal (either on paper, through email or via e-file) after you’ve completed this step, learn how you can enter it into the case package.
Step 4: Review and submit the case package to OLT
Once you have entered the required data and uploaded all documents, you will review the Summary, complete the declaration statement and select Submit. You will then receive an email confirming that you have successfully forwarded the case package to OLT.
Do not submit the case package to OLT until the appeal deadline is expired in case more related appeals are filed that you need to add to the case package. Refer to the applicable legislation to determine the specific timeframe you have after the appeal deadline to submit the case to OLT. For example, some legislation may allow up to 15-20 days.
Instructions for appeals received on paper or via email
Step 1: Scan and save any documents received on paper
To assist the processing of your appeal, please name your saved document files using a descriptive naming convention, such as:
I. the appellant's last name or corporation/organization name
II. the document type
III. the date of submission (month/day/year)
For example: “SmithAffidavit12-05-23”.
Important: Do not use special characters in naming your documents. Special characters are any characters that are not an alphabetic or numeric character. For example: $%#!+*/@\;^” You may upload Microsoft products (e.g., Word, Excel), PDFs, MP4s, JPEGs or other image files. Msg format and zip files are not supported. Please save any unsupported file types as PDFs before uploading to the e-file portal.
Step 2: Enter the appeal in e-file
There are two ways you can do this:
Option 1: As a new case - Use this method if this is the only appeal for a case that you’ve received.
- Add any case parties (e.g., appellant(s), approval authority contact or approval authority legal representative) before you start creating your case. Click the Case Parties tab (see screenshot below).

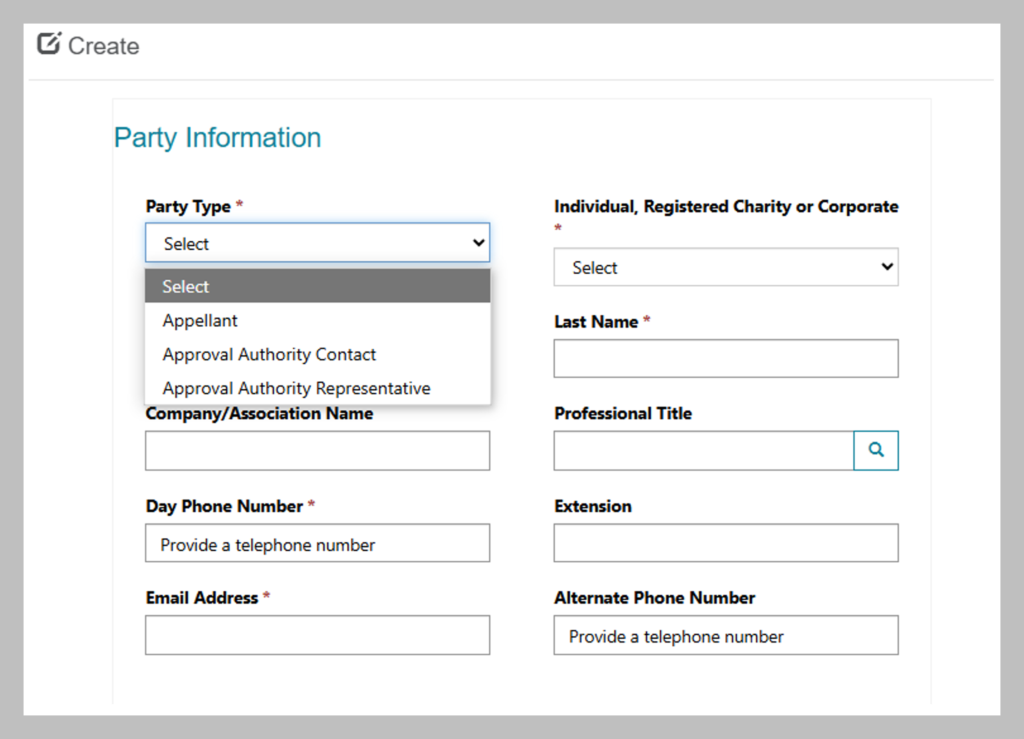
On the Case Parties screen, select Add Party to create a new record and contact details.

Select the Party Type and fill out the required information:
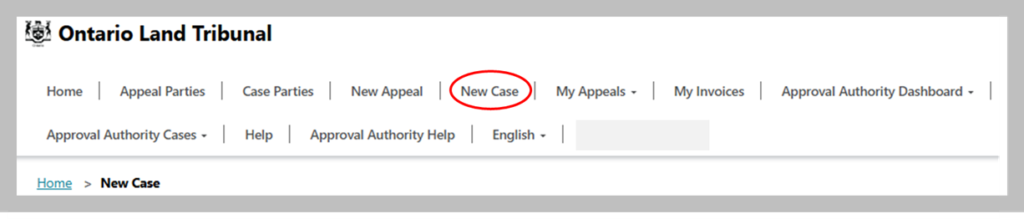
Once you have added all your parties, go to the New Case tab at the top of the page (see screenshot below).
Follow the on-screen directions given in the portal to add information about the case.
When you get to the Appellant Information screen, click the magnifying glass icon in the Appellant search field (see screenshot below)

A pop-up box will appear allowing you to select any appellants you’ve previously entered or you can select New to add a new appellant. See screenshot below.

- Proceed to enter the required information on subsequent pages, such as approval authority contact details and case details.
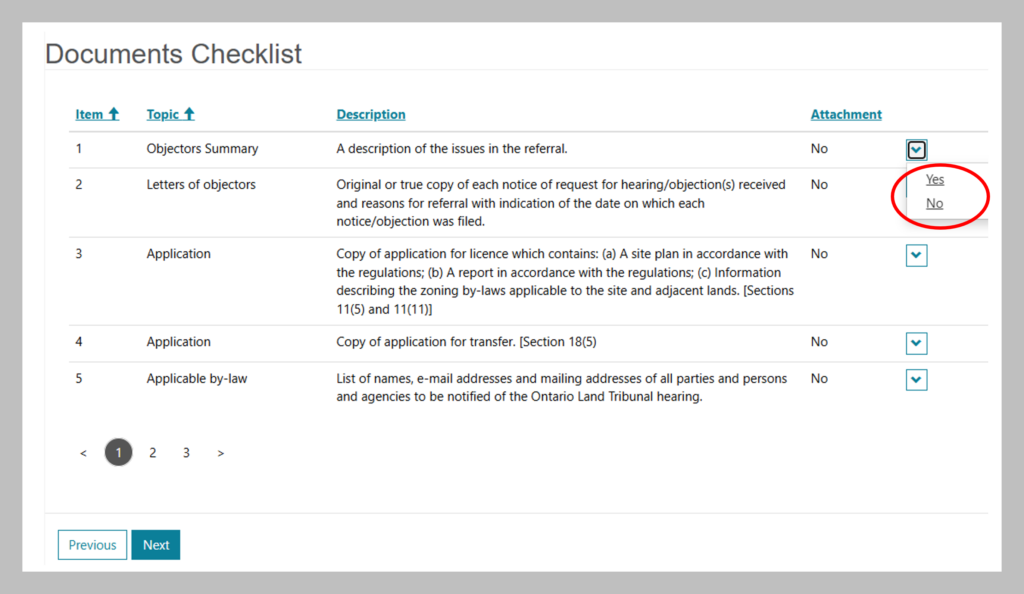
- When you arrive at the Documents Checklist section, indicate whether you will be attaching the listed documents by selecting “Yes” from the drop-down menu). For the checklist item titled “Appeal,” click Yes to indicate you will be uploading the appeal received on paper or email here. See screenshot below.
- Click Next to continue to next screen where you can upload these documents.
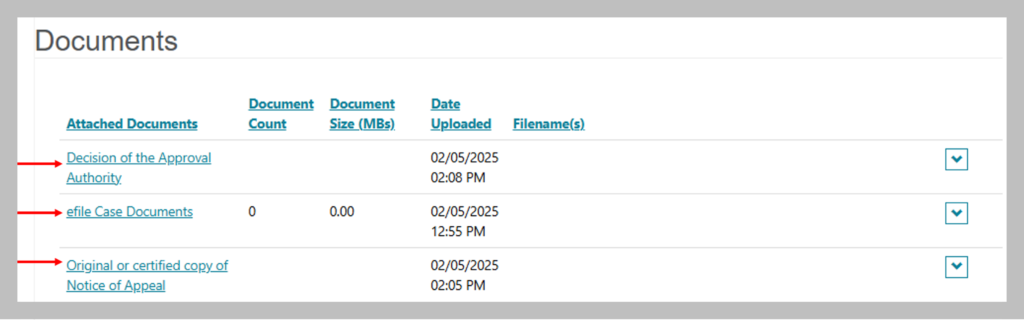
- On the next screen, upload the documents you selected from the document checklist by clicking on the document name, which will appear listed in the Attached Documents column. Also upload the appeal file and any accompanying documents you scanned/saved in Step 1 by selecting “Appeal” or “eFile Case Documents”. See screenshot below.
Option 2: As an attachment to an in-process case package - Use this method if you receive an appeal that relates to a case package that you’ve already started
- For example, where one appeal was submitted through e-file and another appeal of the same instrument (e.g., By-law 123) was submitted via email or on paper.
- In the section of the case submission process where you upload documents, select “Appeal” or "eFile Case Documents” and upload the electronic copy of the appeal form there, including any accompanying documents.

Step 3: Forward payment (if applicable)
If the appellant has paid by cheque, you can mail/courier the appellant’s cheque to the OLT at 655 Bay Street, Suite 1500, Toronto, ON, M5G 1E5.
Instructions for level-1 administrators: managing staff access to e-file
There are two levels of access to e-file available to registered approval authorities:
Level-1: Administrator
Municipal staff, such as the Clerk, can request from OLT to add them as Level-1 Administrators. Level-1 access can only be granted by OLT staff after a verification process is completed. The Level-1 administrator(s) are OLT’s primary contact(s) for e-file. Level-1 administrators can grant or revoke access to other staff from their office.
Level-2: General/Regular user
The Level-2 users are any staff in the approval authority office who have been granted access by their Level-1 administrator(s). They do not need approval from the OLT to access e-file. They have the same ability as Level-1 administrators to:
• review submitted appeals
• enter new appeals
• manage party and representative contacts
• create and submit case packages to the OLT
Adding level-2 users
To invite a staff person to become a level-2 user:
• go to the Approval Authority Administration tab (see screenshot below)

• click Create Invitation to enter the email address for the individual you wish to invite

They will receive an email from e-file with a link to register on the portal. As part of the registration process, they will need to sign-up for a My Ontario Account. Once they register, their name will appear under the Approval Authority Administration tab in the Active Users list.
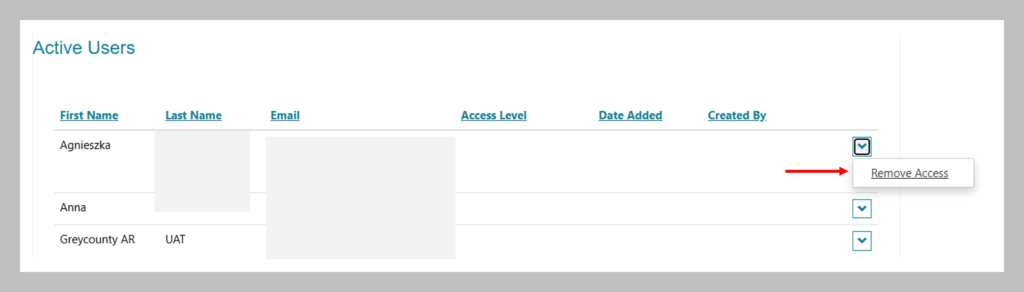
Revoking level-2 users
You may need to remove users if they are leaving the organization or changing roles. Under the Approval Authority Administration tab, you will see a list of Active Users. Click on the down arrow next to the name of the user you’d like to remove and select “Remove Access”. The user will receive an email notification that their access has been removed.
Technical/Troubleshooting notes
The e-file portal does not work well with older browsers. Please navigate using current browsers (e.g., Google Chrome, Firefox, Microsoft Edge). If you experience issues, try disabling pop-up blockers or clear your browser cache.
In the event of a system outage:
- download and complete the M1 Municipal/Approval Authority Submission Form
- submit the form (and any supporting documents) directly to the Ontario Land Tribunal via email at OLT.Registrar@ontario.ca.
